Introduction
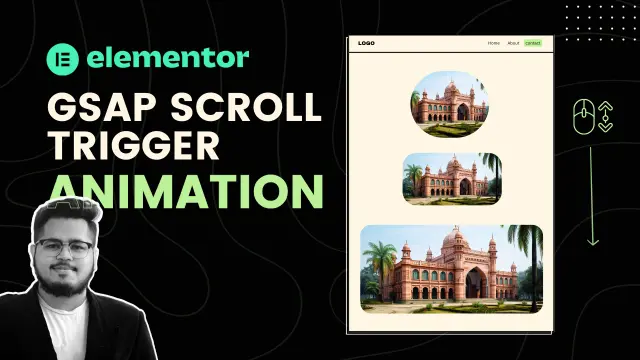
Do you want to add smooth scroll animations to your Elementor website? With GSAP ScrollTrigger, you can create awesome animations that activate when users scroll—no Elementor Pro required!
In this guide, I’ll show you how to add a ScrollTrigger animation in Elementor step by step. Let’s get started!
What is GSAP ScrollTrigger?
GSAP (GreenSock Animation Platform) is a powerful tool for creating smooth animations. ScrollTrigger is a GSAP plugin that allows you to animate elements when the user scrolls.
Why Use GSAP ScrollTrigger in Elementor?
✅ Works with the free version of Elementor
✅ Adds modern scroll animations
✅ Lightweight and fast (no extra plugins needed)
✅ Can be used for text, images, and sections
Step-by-Step Guide to Adding GSAP ScrollTrigger in Elementor
Step 1: Create Your Elementor Layout
- Open your Elementor editor and create a new section.
- Add a container (name it “Main Wrapper”).
- Set the container’s width to full and height to 400VH for scrolling space.
Step 2: Add a Sticky Container
- Inside the Main Wrapper, add another container (name it “Sticky Wrapper”).
- Set its position to sticky in Motion Effects settings.
- Adjust the minimum height to ensure smooth scrolling.
Step 3: Add an Image & Background
- Inside the Sticky Wrapper, create another container (name it “Image Wrapper”).
- Set its width & height to 600px.
- Go to Style → Background and add an image.
- Set:
- Position: Center-Center
- Repeat: No-repeat
- Size: Cover
Step 4: Add Custom Classes
To make animations work, add these CSS classes:
- Main Wrapper:
.sticky-circle-wrap - Image Wrapper:
.image-box
Step 5: Add GSAP ScrollTrigger Code
- Drag an HTML Widget into the Main Wrapper.
- Paste your GSAP ScrollTrigger code inside.
- Publish the page and preview the effect!
Fixing Overlapping Issues
If your animation overlaps with the footer, do this:
- Go to Sticky Wrapper settings
- Enable “Stay in Column” under Motion Effects
Final Result
Now your website has a smooth scroll-triggered animation using GSAP ScrollTrigger in Elementor—without needing Elementor Pro!
Conclusion
Adding GSAP ScrollTrigger animations in Elementor makes your website look modern and engaging. It’s easy to set up, lightweight, and works with the free Elementor version!
💬 Have questions? Let me know in the comments!
📢 Want more Elementor tips? Subscribe to my YouTube channel, Alentora!
🚀 Need help with your website? Contact me here!